Showing posts with label Computer Tips. Show all posts

Many of us are facing the problem of blocked websites and don’t know How to access the blocked sites, but there are various software’s/VPN’s that can be used to access the blocked sites. So this post will give you complete guidance about how to access the Blocked sites using the Software’s, Proxies, VPN’s etc.
Below is the list of tools that can be used to access the blocked websites:
      1. Proxy Websites:
There are many websites through which we can use the IP Proxies in order to access the blocked websites. List of few are:
  • Hidemyass.com
  • Free Web Proxy
  • Proxy sites list
  • Gold proxy list
  • Proxy List forall
  • All proxy sites
  • Proxy.org
Note: In order to use the proxy in web browser see How to manually Configure Proxy Address and Port to use free Internet on PC
2. Proxy Tool for Desktop:
There are many proxy tools that can be used on the system desktop to access the sites that are blocked by your office/school/university etc., but the speed of these proxy tools is little less as compared to IP Proxies and VPN’s.
List of some are:
  • Ultrasurf
  • Tor
  • Your Freedom
  • Freegate
  • Gpass
  • HTTP-Tunnel
3. VPN’s:
VPN(Virtual Private Network) is the network that works fine in any type of configuration provided; also the speed of VPN is quite good. These are list of VPN’s that work fine with your system.
  • Hotspot Sheild
  • SecurityKiss.
  • ProXPN
  • Private Tunnel
These are some of the few Software and IP Proxies
tricks which will definitely help you to access the blocked site.

If you face any problem, or have any sugestion regrading this post or blog…Please comment below..You comment values the most.


Below is a listing of our top 10 favorite Firefox add-ons or extensions. Part of what makes Mozilla Firefox so great is all the available add-ons and installing these add-ons can help improve your abilities and the overall feel of Firefox. Each of these add-ons can be found through the Mozilla Firefox add-ons page or through the links provided below.
StumbleUpon
Great add-on that works with StumbleUpon that allows you to browse only the best of what the Internet has to offer.
AnyColor
Another fantastic add-on that allows you to change the color and appearance of Firefox to any color of your choice.
Download Statusbar
Often one of the first add-ons we install after installing Firefox for the first time. This add-on displays the download status on the status bar instead of opening a new download window.
TinyURL Generator
Another great add-on that allows you to click a small icon in the bottom corner of the Firefox window to quickly generate a small URL for the page you're looking at. This is fantastic if you find yourself sharing long URL links often.
WOT
Fantastic add-on that helps keep your web surfing secure. The add-on will display a warning screen across a web page if it's deemed insecure. A security warning could be caused when the web page is known to participate in phishing, has Trojans, scams, etc.
Omnibar
Another great add-on that turns your URL bar into a Google search as well as the address bar. This helps save your browser real-estate space by removing the redundant Google Search box.
AutoCopy
Another great add-on that allows you to quickly copy and paste text. A must for any blogger who finds themselves frequently copying and pasting text. highlighting the text will immediately copy that text, without having to right-click and select copy or using a keyboard shortcut.
Adblock Plus
Another add-on that's a must for users who're sick of sites that plaster advertising on their pages. This great add-on allows you to add and remove advertisements from a web page so you don't have to look at them.
Read It Later
Another great add-on that helps eliminate the dozens of tabs some users keep open because they haven't finished or started reading that tab.
Time Tracker
Finally, this little gem allows you to keep track of how much time you're spending in Firefox by displaying a little clock in the right portion of the status bar.
Time Tracker link

See More Tips and tricks- Here


You don't need the http:// portion of a web page
When typing an Internet address you do not need to type http:// or even www. in the address. For example, if you wanted to visit Computer Hope you could just type computerhope.com and press enter. To make things even quicker, if you're visiting a .com address you can type computerhope and then press Ctrl + Enter to type out the full http://www.computerhope.com address.
Quickly move between the fields of a web page
If you're filling out an online form, e-mail, or other text field you can quickly move between each of the fields by pressing the Tab key or Shift + Tab to move back a field. For example, if you're filling out your name and the next field is your e-mail address you can press the Tab key to switch to the e-mail field.
Tip: This tip also applies to the buttons, if you press tab and the web developer has designed correctly the button should be selected and will allow you to press the space bar or enter to push the button.
Tip: If you have a drop-down box that lists every country or every state you can click that box and then press the letter of the state or country you're looking for. For example, is a drop-down box of States in the United States you could press u on the keyboard to quickly scroll to Utah.
Use Internet search engines to their full potential
Make sure to get the most out of every search result. If you're not finding what you want try surrounding the text in quotes. For example, if you were searching for 'computer help' this actually searches for pages that contain both computer and help and not necessarily pages that have computer and help next to each other. If you search for "computer help" with the quotes around the search query this will only return pages that actually have computer and help next to each other.
Tip: Many new computer users also don't realize that in every search box you can press enter instead of having to move the mouse button over to the Search button.
Know your Internet browser shortcuts
There are dozens of different shortcut keys that can be used with Internet browsers. Below are a few of our top suggested Internet browser shortcuts.
- Pressing Alt + D in any major Internet browser will move the cursor into the address bar. This is a great way to quickly enter an Internet address without having to click the mouse cursor in the address bar.
- Hold down the Ctrl key and press the + or - to increase and decrease the size of text.
- Press the backspace key or hold down the Alt key + left arrow to go back a page.
- Press F5 to refresh or reload a web page.
- Press F11 to make the Internet browser screen full screen. Press F11 again to return back to the normal view.
- Press Ctrl + B to open your Internet bookmarks.
- Press Ctrl + F to open the find box in the browser to search for text within the web page you're looking at.
ake advantage of tabbed browsing
Take full advantage of tabbed browsing in all Internet browsers today. While reading any web page if you come across a link you may be interested in open that link in a new tab so it can be viewed later. A new tab can be opened by holding down the Ctrl key and clicking the link or if you have a mouse with a wheel click the link with the middle mouse button.
Try alternative browsers
Most computer users use the default browser that comes included with the computer, with Microsoft Windows this is Internet Explorer. There are several great alternative browsers that are all free to download and use and may have features your current browser does not include. Below are a few of our favorites, try one or try them all.
Install plugins and add-ons
Each of the above alternative browsers also have a large community of volunteers who develop add-ons and plugins that can be added into the browser. Each of these browsers have hundreds of thousands of these add-ons that can do such things as giving you live weather in your browser window, changing its color, and adding additional functionality.
Make sure your browser and its plugins are up-to-date
Each Internet browser can have several additional plugins that give it additional functionality. For example, Adobe Flash is a great way to bring movies and other animated content to the Internet. Keeping these plugins up-to-date is vital for your computer stability and also security. Using the below tool you can quickly verify if your plugins are up-to-date and get links to where to download the latest updates.


See More Tips and tricks- Here

PC computer troubleshooting tips
Nothing can put a damper on productivity quite like a computer that crashes on a regular basis. Sometimes, a crash is preceded by the dreaded “blue screen of death” or another warning; other times, a computer simply shuts off without any warning at all. In either case, the end result is a whole lot of frustration, aggravation and lost work. If your computer has been crashing frequently, you’d probably like to put an end to it. Unfortunately, getting to the bottom of things if often easier said than done. The following tips about improving your computer’s performance, though, are excellent places to begin.

Possibility #1: Corrupted System Registry Files

Every Windows-based PC has something called a Windows registry. The registry contains several files that are integral to the performance and operation of your computer. Over time, some of those files can become corrupted, be misplaced or get lost altogether. When that happens, the system registry becomes compromised – and frequent crashes are all-too-common symptoms. The best way to rule this possibility in or out is by running a Windows registry cleaning program. Such programs scan your Windows registry for problems then automatically make repairs. If you run a registry cleaner and the crashes persist, they are probably being caused by a different issue.

Possibility #2: Disorganized Files

Windows operating systems handle file organization in a way that isn’t very intuitive. Basically, they break files up and fit them into gaps in the computer’s memory. As time goes by, these disorganized files can prompt frequent crashes. Luckily, a great optimization solution is built right into Windows-based PCs: the disk defragmentation utility. Although its location on a computer varies, you can generally locate it within the System and Security section inside the Control Panel. By running a defrag once every few months, you may be able to keep those pesky computer crashes at bay.

Possibility #3: Malicious Software

Malicious software can take many different forms. Sometimes, it’s a virus that is accidentally unleashed after opening a strange email; other times, its adware that tags along with other information that is automatically downloaded from a website. Whatever type it is, there’s no question that malicious software can wreak havoc on a computer’s performance. Happily, there are many topnotch programs out there that regularly scan your computer for the presence of such problems – and that help guard against them, too. Buy one, install it and use it regularly; your crash issues may come to an end.

Possibility #4: Too Little Available Memory

When you buy a new computer, it feels like there’s no end to the amount of memory that it has. Of course, this isn’t true at all. As never-ending as the available memory on your PC may initially seem, the fact is that it can be depleted with incredible speed. You can find out for sure by checking the information within “My Computer.” If it appears that your available memory is low, you can use a PC cleanup program to remove unnecessary files; such programs remove things like temporary Internet files and other file debris that can suck away much-needed memory.

Possibility #5: Overheating

If you’ve run through all of the preceding possibilities and continue experiencing frequent crashes, a hardware issue could be to blame. An easy one to rule out is overheating. A computer’s CPU, or central processing unit, includes a fan that is designed to keep it running cool. Sometimes, the fan wears down and doesn’t work as efficiently; other times, it’s just not able to handle the work that your computer has to do. In either case, buying a bigger, better fan isn’t very expensive. If it puts an end to your PC crashing problem, it will have been more than worth it.

Don’t Put Up with Frequent Crashes!

As discussed, frequent computer crashes can be triggered by a wide variety of issues. Luckily, many of these issues are relatively easy to remedy. Work your way through the preceding list; chances are, you’ll be able to pinpoint the problem and put an effective cure to work. Nine times out of ten, a computer simply needs a little bit of routine maintenance to get it back on track again. In the future, keep these points in mind. Any time you buy a new computer, keep up with its basic maintenance right from the get-go. By doing that, you could avoid “blue screen of death” and crashing problems altogether – and that’s something that you’re bound to appreciate!

With millions of computer users browsing the web at any given time, there are plenty of targets for malicious coders. While computer experts don’t always know why coders choose to build harmful computer programs, the fact is that it happens all the time. Computer viruses can steal personal information, interfere with normal operations, attract spam and even shut down your computer’s hard drive. Protecting your computer is critical for browsing success.

Start With the Basics

Most computer systems come with security features already in place. For example, the Windows operating system is packaged with Microsoft Windows Security Center. When you first open, boot up and register a new computer, you should make sure that this program is functioning. It will give basic protection against spyware, viruses and malware. In addition, a basic firewall is built into this program, providing additional protection and stops for potentially harmful programs. Upon activation, don’t be surprised if your security system needs immediate updating. Software that protects your computer needs regular and consistent updating to stay useful. Viruses are constantly being generated and the several-month lag between when your computer was made and when you first started using it can mean that the database the security system is loaded with is severely out-of-date.

Upgrade to Meet Your Needs

computer security virus tips

Many people operate computers for a long time with only basic protection in place. However, heavy computer users or those who have risky browsing habits can sometimes benefit from upgrading their virus, spyware and malware protection, as well as using a fuller-featured firewall; this is especially important if you use a networked computer system. Basic or free virus protection will still scan and update for viruses. Paid programs, however, offer more features, including ease-of-use and convenience features. The most important thing is to verify the publisher and make sure you are getting what is promised. Most well-known virus protection programs, such as AVG and Norton Security, have reviews available to help you make your choice.

Learn About Spyware Risks

Spyware creates risks that many computer users are not aware of. If you are only protecting against viruses, you could be leaving your computer open to damage. Most people are familiar with spyware that initiates and attracts annoying ad programs. Spyware, however, can be much more malicious as well. Your shopping habits can be tracked by spyware. While not exactly harmful, some people consider this a breach of privacy. The worst spyware programs interfere with normal operations and can even track what you type, sending personal information to people who want to steal your identity. Some spyware redirects your browser to different web addresses, increasing your risks of virus infection and fraud.

How Viruses Work

The main difference between spyware and viruses is how they are spread. A virus reproduces itself and attaches to any document that the computer sends, while spyware can be stored as a cookie or tracking code. A virus is most often found traveling with a piece of computer software, such as a document, picture or piece of music. When dealing with email, it is necessary to open an attachment to become infected, indicating that, in most cases, the computer user must somehow invite the malicious software to replicate on their system. Of course, most people have no idea it is there or what is happening. Some of the sneakiest and most harmful viruses actually masquerade as virus protection software, making them extremely hard to detect. Because of this, it’s crucial to be familiar with your particular virus protection program and know what it looks like and what the normal scripts and prompts are during operation. Viruses do some of the same things that spyware does; they just accomplish it differently. An active virus can steal personal information, generate ads or shut down your system, including the very virus protection programs that can fix the issue.

Take Steps For Protection

Like anything, the best way to protect against viruses is to be educated. Become familiar with what malicious software may look like. If you get an email or are asked to download a file that you don’t recognize or looks suspicious, do your homework. Research virus protection, spyware, malware and firewall programs and use them to their fullest capacity. Set the software to update and scan automatically to make sure that the system is constantly monitored. In addition, regularly check on the databases published by various virus protection services; many will provide lists of symptoms and risks, as well as the standard way the file gains access for no cost to the public.
If you're running Windows XP or Vista with a computer that has a multiple core processor, such as the Intel Core 2 duo, you can increase how fast your computer boots up by having it use multiple processors for its boot sequence. Following the below steps to have Windows do this for you.
  1. Click Start and Run (for XP) and type: msconfig and press enter.
  2. Click the BOOT.INI or BOOT tab.
  3. XP users highlight the line beginning with "multi" if not already selected and click the Advanced Options button.
  4. In the Advanced Options Window for /NUMPROC= or Number of Processors change it to 2.
  5. Reboot the computer.

Customize your tiles
Windows 8 tilesMake the most of your Windows Start screen tiles by adjusting the sizes, where they are located, and what is listed.
  • Move any tile by clicking and dragging the tile. While moving a tile, if you need a larger view of the Start screen move the tile towards the top or bottom of the screen to zoom out.
  • Use your mouse wheel to scroll left-to-right through your tiles.
  • Any Desktop shortcut or program can be pinned to the Start screen by right-clicking the icon and choosing Pin to Start.
  • In the bottom right-hand corner of the start screen is a magnifying glass with tiles, click this icon to get a zoomed out view of your Start screen. In this view, if you right-click on a group of tiles you'll be given the option to name group, which can be useful if you have a group of related tiles (e.g. games). In this view, you can also click and drag a group to organize your tile groups.
  • Create a new speed bump between tile groups by moving a tile to a speed bump.
  • Resize any User tile or Live tile by right-clicking the tile and choosing resize.
  • If there is a tile you want on your Taskbar, right-click the tile and choose Pin to taskbar.
  • Show admin applications on the Start screen by clicking Settings in Charms, click Settings, and change the Show administrative tools from No to Yes.
  • In Internet Explorer 10, you can also pin any of your favorite web pages to your Start Screen.
Windows 8 keyboard shortcuts
Knowing at least some of the Windows 8 keyboard shortcuts will make your Windows 8 experience much more enjoyable. Try to memorize these top Windows 8 shortcut keys.
  • Press the Windows key to open the Start screen or switch to the Desktop (if open).
  • Press the Windows key + D will open the Windows Desktop.
  • Press the Windows key + . to pin and unpin Windows apps on the side of the screen.
  • Press the Windows key + X to open the power user menu, which gives you access to many of the features most power users would want (e.g. Device Manager and Command Prompt).
  • Press the Windows key + C to open the Charms.
  • Press the Windows key + I to open the Settings, which is the same Settings found in Charms.
  • Press and hold the Windows key + Tab to show open apps.
  • Press the Windows key + Print screen to create a screen shot, which is automatically saved into your My Pictures folder.
See our Windows shortcuts page for a full listing of all Windows shortcuts.
Know your hot corners
The corners on your screen are hot corners and give you access to different Windows features. Below, is a brief explanation of each of these corners.
Bottom Left-hand corner
The bottom left-hand hot corner of the screen will allow you to access the Start screen, if you're in the Start screen and have the Desktop open, this corner will open the Desktop from the Start screen.
Tip: Right-clicking in the left hand corner will open the power user menu.
Top-left corner of the screen
Moving the mouse to the top-left corner and then down will display all the apps running on the computer. Clicking and dragging any of these apps to the left or right-hand side of the screen will snap that app to that side of the screen. Each of these open app icons can also be right-clicked to close or snap.
Right-hand side of the screen
On the full right-hand side of the screen will be given access to the Windows Charms.
Taking advantage of search
The Search in Windows 8 has been significantly improved when compared to all previous versions of Windows. To search for a file or run a program in Windows 8 from the Start screen just start typing what you're trying to find or want to run.
As you begin typing, the results will start appearing on the left-hand side. In addition to being able to search for files and run programs, the Search also supports limiting the search to apps such as Finance, People, Maps, Photos, Mail, Music, Videos, Weather, and much more. If what you are searching for is not a file or program, click on the app you wish to use as the search. For example, if you were searching for "New York" and selected the Weather App you would be shown the weather in New York, NY.
By default, Search organizes the available Apps by how frequently they are used and then in alphabetical order. If you want to keep your favorite app at the top of the Search list, right-click the app and choose Pin. Pinning the app will lock it in place regardless of how often it is used. If there is an app you don't want (e.g. Finance) you can turn on and off any of the search apps through the PC settings, which is found under the Settings in the Charms.
Bonus tip: The Search is also found through Charms and can also be opened by pressingWindows key + F.
Running two apps side by side
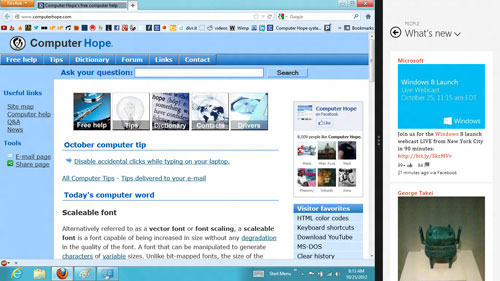
Any app can be pinned to the left or right-hand side of the screen. For example, open the People app and then press the Windows Key + . (period) to move that app to the right-hand side of the screen, pressing the same keys again will move it to the left-hand side, and pressing the same keys again will make it full screen. While an app is pinned, any other app or program can be opened and loaded into the available space on the screen. For example, in the below picture, we've opened a browser window and have the People app running to monitor our social networks.
Windows 8 People
Any open app can also be pinned using your mouse by clicking at the top of the tile and dragging it to the left or right-hand side of the screen.
Bonus tip: The Desktop can also be pinned to the left or right-hand side of the screen.
Note: In order for snap to work properly your resolution must be at least 1,366 x 768.
Windows 8 Task Manager
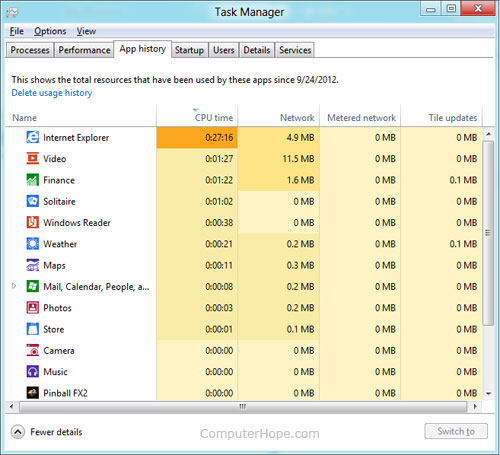
The Windows 8 Task Manager has been significantly improved over previous versions of Windows. Some of the new changes include showing a total percent usage at the top of your Processes, which makes it easier to determine total memory and CPU usage, improved Performance graphs, a Startup tab to see startup processes and their impact to system performance, and the App history tab (as shown below) that gives you the total resources an app has used over a period of time. Press Ctrl + Shift + Esc to start exploring the new Task Manager.
Windows 8 Task Manager
Use a picture password to log into your computer
Windows 8 includes a new feature called Picture password, which allows you to authenticate with the computer using a series of gestures that include circles, straight lines, and taps. Enable this feature if you want a new way to access your computer or have a hard time with passwords.
  1. Open the Windows Charms.
  2. Click Settings and then More PC settings
  3. In the PC settings window click Users and then select Create a picture password
Bonus tip: A four digit pin password can also be created and used to access your computer.
Take advantage of Windows 8 apps
Windows 8 comes included with several apps to help you get the most from your computer. Below are just a few of the included apps.
People
Microsoft touts the People feature in Windows 8 because they understand how many people are using social networks today. In the People feature you'll be able to connect your Windows computer to all the major social networks including FacebookLinkedIn, and Twitter. Once connected, you can pin the people app and monitor your social network (as shown below), use People in Search to find people, and get an overview of what is happening in all your social networks.
Windows 8 People
Reader
The Reader app will give you PDF support right out of the box.
SkyDrive
The SkyDrive app will give you access to the Microsoft cloud service SkyDrive, which allows you to store your photos, documents, and other files in the cloud and access or share those files with any computer with Internet access.
Store
Take advantage of the Windows Store and install one or more of the thousands of available apps designed for Windows 8. The Store is found in the Start screen, or use Search to search the Store app for any apps that you are trying to find.
Know the answers to common questions
Windows 8 is the biggest change to Microsoft Windows since the introduction of Windows 95, which was released all the way back in 1995. Since so many people have grown up with Windows, it can be difficult to transition to a new way of doing things. Below, is a short list of the most common questions previous Windows users will have.
Know the Jargon
Knowing all the new jargon introduced with Windows 8 will help improve your familiarity with Windows 8 and make it a more enjoyable experience. Below, are just a few links to the most commonly used Windows 8 terms.

Below is a listing of our top 10 favorite Firefox keyboard shortcuts. Learning these shortcuts will greatly improve your productivity and overall experience with Mozilla Firefox.
Ctrl + T and middle-click
Pressing Ctrl + T will open a blank new tab or if you want to open any link in a new tab press your middle mouse button (often the scroll wheel) to open that link in a new tab.
Ctrl + Shift + T
Oops, close a tab you didn't want closed, press Ctrl + Shift + T to undo any tab close. Pressing this multiple times will undo multiple closes.
F6
Quickly get to the URL address bar by pressing this function key.
Ctrl + F or /
Pressing Ctrl + F will open the find feature. Using this you can quickly find text within the same page. If you wish to do a quick find and have Firefox scroll to the text location as you type press forward slash (/) instead while in the browser.
Ctrl + W
Close the tab you're currently in.
Ctrl + Tab or Ctrl + Shift + Tab
Move between open tabs.
Ctrl + D
Open bookmark window for page currently viewing.
Ctrl + <plus>, Ctrl + <minus>, and Ctrl + 0
Pressing Ctrl + <plus symbol> will increase the font size, pressing Ctrl + <minus symbol> will decrease the font size, and if you wish to reset the font size back to the default press Ctrl + 0.
F11
Make the screen full screen, removing all toolbars and status bars.
Ctrl + J
Open the Download Manager window.

Introduction
Cleaning your computer and your computer components and peripherals helps keep the components and computer in good working condition and helps keep the computers from spreading germs. In the above picture, is a good example of how dirty the inside of your computer case can get. In this example, its obvious that all the dirt build up will prevent proper air flow and may even prevent the fan from working.
Depending on the environment that your computer operates in determines how often you should clean your computer case. The below list is our recommendation and may change depending upon your computer's environment.
How often should I clean my computer?
The frequency of how often you should clean your computer varies on several different factors. To help you determine how often you need to clean your computer we've created the below chart. Check each of the boxes below that apply to your computers environment to determine how often it should be cleaned.
General cleaning Tips
Below is a listing of general tips that should be taken when cleaning any of the components or peripherals of a computer as well as tips to help keep a computer clean.
  1. Never spray or squirt any liquid onto any computer component. If a spray is needed, spray the liquid onto a cloth and then use that cloth to rub down the component.
  2. You can use a vacuum to suck up dirt, dust, or hair around the computer on the outside case. However, do not use a vacuum for the inside of your computer as it generates a lot of static electricity that can damage the internal components of your computer. If you need to use a vacuum to clean the inside of your computer, use a portable battery powered vacuum designed to do this job or try using compressed air.
  3. When cleaning a component or the computer, turn it off before cleaning.
  4. Be cautious when using any cleaning solvents; some individuals may have allergic reactions to chemicals in cleaning solvents and some solvents can even damage the case. Try to always use water or a highly diluted solvent.
  5. When cleaning, be careful not to accidentally adjust any knobs or controls. In addition, when cleaning the back of the computer, if anything is plugged in, make sure not to disconnect any of the plugs.
  6. When cleaning fans, especially the smaller fans within a portable computer or laptop it's suggested that you either hold the fan or place something in-between the fan blades to prevent it from spinning. Spraying compressed air into a fan or cleaning a fan with a vacuum may cause damage or back voltage to be generated.
  7. Never eat or drink around the computer.
  8. Limit smoking around the computer.
Cleaning tools
Although many companies have created products to help improve the process of cleaning your computer and peripherals, users can also use household items to clean their computers and peripherals. Below is a listing of items you may need or want to use while cleaning your computer or computer peripherals.
Keep in mind that some components in your computer may only be able to be cleaned using a product designed for cleaning that component; if this is the case, it will be mentioned in the cleaning tips.
  • Cloth - A cloth is the best tool used when rubbing down a component; although paper towels can be used with most hardware, we recommend using a cloth when ever possible. Caution: We only suggest you use a cloth when cleaning components such as the outside of the case, a drive, mouse, etc. You should not use a cloth to clean any circuitry such as the RAM or motherboard since they can generate ESD that can damage electronics.
  • Water or rubbing alcohol - When moistening a cloth, it is best to use water or rubbing alcohol. Other solvents may be bad for the plastics used with your computer.
  • Portable Vacuum - Sucking the dust, dirt, hair, cigarette particles, and other particles out of a computer can be one of the best methods of cleaning a computer. Over time, these items can restrict the airflow in a computer and cause circuitry to corrode. Do not use a standard vacuum as it can generate a lot of static electricity that can damage your computer.
  • Cotton swabs - Cotton swaps moistened with rubbing alcohol or water are excellent tools for wiping hard to reach areas in your keyboard, mouse, and other locations.
  • Foam swabs - Whenever possible, it is better to use lint-free swabs such as foam swabs.
Case cleaning
Why? Keeps the appearance of the computer looking new. During cleaning, if ventilation locations are found, these can be cleaned helping the case keep a steady airflow to the computer, keeping components cool and in good working condition.
Procedure: The plastic case that houses the PC components can be cleaned with a lint-free cloth that has been slightly dampened with water. For stubborn stains, add a little household detergent to the cloth. It is recommended that you never use a solvent cleaner on plastics.
Make sure all vents and air holes are hair and lint free by rubbing a cloth over the holes and vents. It is also helpful to take a vacuum around each of the hole, vents, and crevices on the computer. It is safe to use a standard vacuum when cleaning the outside vents of a computer; however, if you need to clean the inside of the computer, use a portable battery powered vacuum to prevent static electricity.
If you are looking for steps on cleaning the inside of the computer, see the motherboard cleaning section.
CD-ROM, DVD, and other disc drive cleaning
Why? A dirty CD-ROM drive or other disc drives can cause read errors when reading discs. These read errors could cause software installation issues or issues while running the program.
Procedure: To clean the CD-ROM drive we recommend purchasing a CD-ROM cleaner from your local retailer such as a local Radio Shack. Using a CD-ROM cleaner should sufficiently clean the CD-ROM laser from dust, dirt, and hair.
In addition to cleaning the drive with a special disc designed to clean drives users can also use a cloth dampened with water to clean the tray that ejects from the drive. Make sure however that after the tray has been cleaned that it completely dry before putting the tray back into the drive.
See the CD cleaning recommendation for further steps on cleaning each of your CDs.
CD and DVD disc cleaning
Why? Dirty CDs can cause read errors or cause CDs to not work at all.
Procedure: Cleaning CDs and DVDs should be done with a cleaning kit but can also be done with a normal clean cotton cloth or shirt. When doing this with a clean cotton cloth or shirt, wipe against the tracks, starting from the middle of the CD or DVD and wiping towards the outer side as shown in the below picture. Never wipe with the tracks; doing so may put more scratches on the disc.
Cleaning a CD and DVD disc
It is recommended when cleaning a CD that water is used. However, if the substance on a CD cannot be removed using water, pure alcohol can also be used.
Hard drive cleaning
Why? While hard drives cannot be cleaned physically, they can be cleaned with various utilities on the computer to help it run fast and more efficiently. Utilizing these utilities will prevent the hard drive from slowing down.
Procedure: Refer to our basic troubleshooting section for your operating system for steps that can be done to help improve the performance of your computer.
Headphones cleaning
Why? Headphones that are used by multiple people may need to be cleaned frequently to help prevent the spreading of germs and head lice.
Procedure: If the headphones being used are plastic or vinyl, moisten a cloth with warm water and rub the head and earpieces of the headphones. As mentioned earlier in our cleaning tips, it is recommended that if your headphones are being used for a library or school that you do not use any disinfectant or cleaning solvent as users may have allergic reactions to the chemicals they contain.
Headphones that have cushions also have the availability of having the cushions replaced. Replacing these cushions can also help keep the headphones clean.
Finally, in regards to headphones and the spreading of head lice, if multiple students are using your headphones, you should consider having the students use their own headphones, using bags that are placed over the headphones, or having headphones that can be wiped with warm water after each student has used the headphones.
Keyboard cleaning
The below steps are for cleaning a standard desktop keyboard. See the cleaning a laptop keyboard page for steps if you have a laptop.
Dust, dirt, and bacteria
The computer keyboard is often the most germ infected items in your home or office, often it will contain more bacteria than your toilet seat. Cleaning it can help remove any dangerous bacteria. Dirt, dust and hair can also build up causing the keyboard to not function properly.
Procedure: Before cleaning the keyboard first turn off the computer or if you're using a USB keyboard unplug it. Not unplugging the keyboard can result in causing other computer problems as you may press keys that cause the computer to perform a task you don't want it to do.
Many people clean the keyboard by turning it upside down and shaking. A more effective method is to use compressed air. Compressed air is pressurized air contained in a can with a very long nozzle. aim the air between the keys and blow away all of the dust and debris that has gathered there. A vacuum cleaner can also be used, but make sure the keyboard doesn't have loose "pop off" keys that could possibly be sucked up by the vacuum.
If you wish to clean the keyboard more extensively you'll need to remove the keys from the keyboard.
After the dust, dirt, and hair has been removed. Spray a disinfectant onto a cloth or use disinfectant cloths and rub each of the keys on the keyboard. As mentioned in our general cleaning tips, never spray any liquid onto the keyboard.
Substance spilt into the keyboard
If the keyboard has anything spilt into it (e.g. pop, cola, Pepsi, Coke, beer, wine, coffee, milk, etc.), not taking the proper steps can cause the keyboard to be destroyed.
Procedure: Below are a few recommendations to help prevent a keyboard from becoming bad once a substance has been spilt within it.
If anything is spilt onto the keyboard turn the computer off immediately or at the very least disconnect it from the computer. Once done flip the keyboard over helping to prevent the substance from penetrating circuits. While the keyboard is upside down, shake the keyboard over a surface that can be cleaned later. While still upside down, use a cloth to help clean out what can be reached. After cleaned to the best of your ability leave the keyboard upside down for at least one night allowing it to dry. Once dry, continue cleaning the keyboard with any remaining substance.
If after cleaning the keyboard you have keys that stick remove the keys and clean below the keys and the bottom portion of the key.
Finally, if the keyboard still works but remains dirty or sticky before discarding the keyboard as a last resort try washing the keyboard in the dishwasher.
If after doing all the above steps the keyboard does not function properly or at all it's recommended you buy a new keyboard.
Additional Information: Keyboard Page
LCD cleaning
Why? Dirt, dust, and finger prints can cause the computer screen to be difficult to read.
Procedure: Unlike a computer monitor, the LCD or flat-panel display is not made of glass, therefore requires special cleaning procedures.
When cleaning the LCD screen it is important to remember to not spray any liquids onto the LCD directly, press gently while cleaning, and do not use a paper towel as it may cause the LCD to become scratched.
To clean the LCD screen we recommend that you use a non-rugged microfiber cloth, soft cotton cloth, or Swiffer duster. If a dry cloth does not completely clean the screen, you can apply rubbing alcohol to the cloth and wipe the screen with the damp cloth. Rubbing alcohol is used to clean the LCD before it leaves the factory.

Monitor cleaning
Tip: This section is for computer monitors if you have a LCD or flat-panel see the LCD cleaning section.
Why? Dirt, dust, and fingerprints can cause the computer screen to be difficult to read.
Procedure: The glass monitor screen can be cleaned with ordinary household glass cleaner*. Be sure to remove power from the monitor and spray the cleaner onto a lint free-cloth so the fluid doesn't leak into the electrical components inside the monitor. Vacuum off any dust that has settled on top of the monitor, and make sure no books or papers have been placed on the air vents. Obstructed monitor vents can cause the monitor to overheat or even catch on fire.
Caution: We suggest using a cloth dampened with water when cleaning monitor on a screen that is not made of glass or has any anti-glare protection on the screen. Using ordinary household glass cleaner on special screens, especially cleaners with ammonia can remove anti-glare protection or other special surfaces.
Other good cleaning solutions
  • Microfiber Towels
  • Swiffer Dusters
Motherboard cleaning
Why? Dust and especially particles of cigarette smoke can build up and corrode circuitry causing various problems such as computer lockups
Caution: When inside the computer take the necessary ESD precautions and try to avoid unplugging any cables or other connections.
Procedure: Our recommendation when cleaning the motherboard from dust, dirt, or hair is to usecompressed air. When using compressed air, hold it in the up-right position; otherwise, it is possible chemicals may come out of the container that could damage or corrode the Motherboard or other component within the computer. Also, ensure when using compressed air that you always blow the dust or dirt away from the motherboard, or out of the case.
Another good alternative to compressed air is to use a portable battery powered vacuum that can effectively remove the dust, dirt, and hair from the motherboard completely and prevent it from getting trapped within the case. However, do not use a standard electricity powered vacuum as it can cause a lot of static electricity that can damage the computer. When using the vacuum it is vital that you stay a couple inches away from the motherboard and all other components to help prevent contact as well as to help prevent anything from being sucked into the vacuum. Ensure that you do not remove any small components with the vacuum such as jumpers.
Tip: When cleaning the inside of the case also look at any fans or heat sinks. Dust, dirt, and hair collects around these components the most.

Mouse cleaning
Why? A dirty optical-mechanical mouse (mouse with a ball) can cause the mouse to be difficult to move as well as cause strange mouse movement.
Procedure: To clean the rollers of an optical-mechanical mouse, you must first remove the bottom cover of the mouse. To do this, examine the bottom of the mouse to see what direction the mouse cover should be rotated. As you can see in the below illustration, the mouse cover must be moved counter clockwise. Place two fingers on the mouse cover and push the direction of the arrows.
Computer mouse with ball removedOnce the cover has rotated about an inch, rotate the mouse into its normal position, covering the bottom of the mouse with one hand and the bottom should fall off including the mouse ball. If this does not occur, attempt to shake the mouse gently.
Once the bottom cover and the ball are removed, you should be able to see three rollers located within the mouse. Use a cotton swab, finger, or fingernail to remove any substance. Usually, there will be a small line of hair and dirt in the middle of the roller, remove as much as this substance as possible.
Once you have removed as much dirt and hair as possible, place the ball back within the mouse and place the cover back on.
If the mouse still appears to be having the same issue, repeat the above process; if after several attempts the mouse is still having the same issues, it's likely that your mouse has other hardware issues and we recommend that it be replaced.
Note: Cleaning your mouse pad with a damp cloth can also help improve a computer's mouse movement.
Why? To help keep a mouse clean and germ free it can be helpful to clean the mouse.
Procedure: Use a cloth moistened with rubbing alcohol or warm water and rub the surface of the mouse and each of its buttons.

Printer cleaning
Why? Cleaning the outside of a printer can help keep the printer's appearance looking good; and in the case of a printer that is used by many different people, keep the printer clean of germs.
Procedure: First, make sure to turn off the printer before cleaning it. Dampen a cloth with water or rubbing alcohol and wipe the case and each of the buttons or knobs on the printer. As mentioned earlier, never spray any liquid directly onto the printer.
Why? With some printers it may be necessary to clean the inside of the printer to help keep the printer running smoothly.
Procedure: Because of how many different printers there are, steps in cleaning printers, and printer manufacturer policies on cleaning the inside of the printer, we recommend you obtain the printer cleaning steps from your printer manufacturer.
Scanner cleaning
Why? Flatbed scanners commonly become dirty with dust, fingerprints, and hair. When a scanner is dirty, the images may have distortions. 
Procedure: Clean a flatbed scanner's surface by spraying a window cleaner onto a paper towel or cotton cloth and wipe the glass until clean. As mentioned earlier, never spray a liquid directly onto the component.
To clean the outside of the scanner, the same towel or cotton cloth can be used.
Miscellaneous cleaning steps
Below are a listing of miscellaneous computer hardware that is rarely used today, but kept on this page for the few people who are working on older computers and need to clean these devices.
Floppy drive cleaning
Why? Dirty read/write heads on the floppy drive can cause errors during the reading or writing process.
Procedures: The floppy drive can be cleaned two different ways. The first method of cleaning a floppy drive, and our recommended method, is to purchase a kit at your local retail store designed to clean the read/write heads on your floppy drive.
The second method of cleaning the floppy drive is only recommended for experienced computer users. Open the floppy drive casing and physically swab the read/write heads with a lint-free foam swab soaked in pure alcohol, free-on, or trichloroethane. When performing these steps, be extremely careful when cleaning the heads to ensure that you do not lock them out of alignment causing the floppy drive to not work. To help prevent the heads from becoming out of alignment, use a dabbing motion lightly putting the swab on the head and removing it, do not perform a side-to-side motion with the swab.

Palm pilot cleaning
Why? Dirty touch screens can cause difficult navigation.
Procedure: To clean the Palm Pilot Screen, use a soft cloth moistened with rubbing alcohol and rub the screen and the casing of the palm pilot. It is not recommended to use glass cleaner as it could damage plastics over time.
SuperDisk and LS120 cleaning
Why? It is recommended that the SuperDisk and LS120 drive be cleaned regularly to prevent drive heads from becoming dirty.
Procedure: Purchase the SuperDisk cleaning kit available through Imation. Using any other method will void the warranty on your drive.

My Alexa Ranking

Popular Posts

Facebook Box

Categories